|
Main Window Menus Preferences Setup Window
Info Help Index |
LXConsole Setup-> OSC
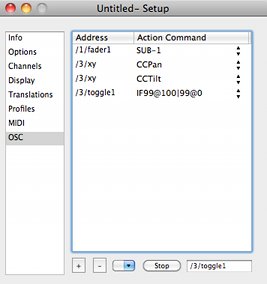
The OSC tab of the Setup window allows editing of a list of actions that can be triggered from OSC packets via a UDP network connection. Action commands triggered by OSC can be a command executed from the command line, a "GO" type button command that is run by the Live window, or control of a fader in the Channel Controls or Live window. The Detect button allows you to detect received OSC packets. Clicking this button causes OSC input to be enabled. Detect allows you to find the appropriate address value by pressing a key or moving a slider to send an OSC message to LXConsole. OSC Action Commands Arguments to OSC Messages can be retrieved by reading them off the list of received arguments one at a time. Each time an argument is requested, the next value on the list is read and the pointer is advanced until there are no more arguments to read. Arguments can be read as the following types:
A command of "1>10@%p" will replace %p with the percentage value corresponding to the 0.0-1.0 float value of the next argument in the list. Commands with implied levels interpret the next argument as a float which is converted into a percentage. GO commands have two forms: simple "GO" which runs the next cue in the Live window and "GO:%f" which runs the cue number corresponding to the float value of the next argument. Other Live window buttons can also be mapped to OSC by entering "BACK", "HOLD", or "STOP". Other OSC actions include "LIVE" which switches the main display to live mode. "UNMARK" will unmark the channels in live mode. This is useful because marked channels will not be overridden by a submaster and this provides a way to release marked channels without executing a cue. Any command that can be executed from the command line can also be triggered by an OSC message. Arguments can be substituted as above. With OSC, the entire command can be sent as a string argument to an OSC message (the command setup for the OSC message would read simply "%s"). A "record" OSC action command will record the current live state as the current live cue. But if the cue exists, there will be a warning. A "record!" OSC action command will record over the current cue with no warning. Action commands are able to directly control submasters using a command of the form "SUB-nn" (where nn is the submaster number). The SUB- command directly sets the level of the submaster to the floating point value of the next argument interpreted as a percentage. Note: a "SUB-1" command has the same effect as "sub: 1@%v" except that the former updates more quickly than the command line version. There is a preference in the MIDI/OSC tab that always switches to live mode when executing a command line type MIDI command. This prevents accidental remote editing in blind mode. Action commands are able to control a fader in the Channel Controls window. These commands take the form of "CCIntensity", "CCPan", "CCTilt", "CCBeam", or "CCIris". Left plain, the floating point value of the next argument interpreted as a percentage sets the level of the fader. Alternatively, you can specify a specific level, ie "CCIntensity@50" or "CCPan@home". Subchannels that do not have faders in the Channel Controls window can be controlled using a combination of "CC" followed by the subchannel number. For example, "CC23" controls the red subchannel. The manual fade percentage can be set using a command "manual@nn" (where "nn" is the desired level or "%p" to use the next argument). Note: to control an fade manually, you must set the manual level to 0 and then send a "GO" command. It is also possible to control the manual up and down fades independently. The OSC commands are "manup@nn" and "mandown@nn" respectively. The manual fader in the live window reflects the up progress. A split manual fade is not complete until both up and down are at 100%. The master level can be set using a command "master@nn". Where "nn" is the desired level or "%p" to use the next argument. The IF command uses the next argument value to determine which of two command line commands to execute. These commands are separated by a vertical bar. "IF1>10@100|1>10@0" will set channels 1 to ten to full if the argument value is greater than 0 OR it will set channels 1 to 10 out if the argument is equal to 0. An alternate form of the IF action is similar to the ternary operator in the c programming language, "?<action1>|<action2v>". The difference between the ? and IF form is that IF is restricted to command line commands. The ? operator performs action1 if the first argument of the message is non-zero. It performs action2 if the first argument of the message is zero. But, action2 is executed with a float argument equal to 1.0. This makes it possible to toggle an effect with a command like the following: "?EFXstart:fx1|EFXstop:fx1" Sets of OSC actions defined in a setup can be exported/imported in an XML based format. So, once you've mapped the buttons and sliders on your OSC controller, you can re-use that setup in another file. Direct OSC Messages to the Command Line OSC messages can also directly manipulate the command line without the need for setting up actions in the Setup window. An OSC message that begins with the address /cmd.lxconsole/ will cause the portion of the message following this to be executed on the command line. For example the OSC message "/cmd.lxconsole/1@50" has the same effect at typing "1@50" into the command line. You can also send individual key presses to the command line by using the form /key.lxconsole/k where k is replaced by the key on the keyboard ("enter" and "clear" are not a single character but are spelled out). To achieve the same effect as the above example, 4 OSC messages are required using this method: "/key.lxconsole/1", "/key.lxconsole/@", "key.lxconsole/5", and "/key.lxconsole/0". Effects can be controlled by OSC actions. "EFXstart:", "EFXstop:", and "EFXclear:" commands need to have the effect name follow the colon. "EFXstop:" with no name will stop all effects. "EFXstopAll" will stop all effects and clear them as well. The "EFXmaster:" command can have an explicit level such as "EFXmaster:Effect 1@50". Or, if the "@" level is not specified, a single floating point argument in the range 0.0-1.0 is used to set the effect level. Likewise, the "EFXrate:" command can either specify a rate or use the velocity. In addition, the "EFXrate:" command can use the velocity to sat a rate within a range such as "EFXrate:Effect 1?10,200" which would use the floating point argument to set a rate between 10% and 200%. (If you are using the effect rate command, the effect name should not include a question mark or comma!) QLab style /cue/n/___ messages. LXConsole can respond to QLab style "/cue/" messages. These messages must be enabled in the preferences. But, require no other setup. For example, an OSC message with the address pattern /cue/1/start will trigger cue 1.
| |||||||||||||||||||||||||||||||||||||||