|
Main Window
Command Line Preferences Setup Aux Windows Help Index |
LXConsole Main Window-> Inspector Cue Info LXConsole's window has a an Inspector pane that gives access to information about the current cue and also contains the cue list, group list, sub list and patch tables.
The Inspector is opened and closed using the button next to the cue number in the upper right of the main window. Or, the Inspector can be resized with the divider between it and the main display pane. The What and When text areas allow rich text. This means you can use format commands from the font menu to change the text. There is a shortcut to entering crossfade times where the up and down times are the same. A return or enter in either the Up or Wait Up fields that does not change the value of the field automatically copies the value to the corresponding down field. Cue Options
The Cue Options tab contains elements special options for cues and subs. A cue can be set to block tracking so that no levels are tracked into the cue from the prior cue. A cue can also be set to don't track so that no levels are tracked from the cue into the next cue. A cue can also reference one or more groups. When the cue is updated, the marked levels from the referenced group(s) are copied into the cue.
Options for subs include the ability to act as an inhibitive master which puts a proportional maximum output on all marked channels in the sub. Subs treat intensity as highest takes precedence (HTP) where the master level of the sub is combined with the level of a marked channel. The output level of the channel is the higher of the level set by the sub and its level from other sources. Non-intensity subchannels that are marked in a sub, jump to their recorded level when the sub's master is greater than zero. If desired, non-intensity subchannels can be instead treated proportionally, HTP like intensity. A submaster can also be used to control the level of an effect. When the effect's name is added in the cue options tab, the effect will be started as soon as the sub's master level rises above zero. The master level of the sub is used as the master level for that effect. The effect is stopped when the sub's level returns to zero.
The Actions table in the Cue Options tab allows you to specify actions to be performed when the cue is run. These actions include controlling effects, sending MIDI Show Control and other MIDI messages, controlling the link of the cue with a counter and running AppleScripts. Multiple actions can be executed with a cue. However, only one AppleScript should be run at any time. Different parameters are required for each of these actions. For instance, starting an effect requires the name of the effect. For ease of configuration, selecting an action in the table and clicking the Edit... button will help set the parameter(s) properly. Effects can be started, stopped and stepped through actions. Effect Start actions require the name of the effect to be started when the cue is run. The Effect Stop and Effect Step actions do not require any additional information. Actions can send MIDI messages including show control (SysEx) and message other types. In order to send MIDI out, the connection must be enabled using the File->External->MIDI/Show Control Out command. MIDI messages can be sent with or without a specific MIDI channel or device ID set. If no channel is specified, the MIDI out channel or device ID found in the Preferences is used. Other specifics of the MIDI output connection are set in the Preferences as well. When MIDI/Show Control Out is enabled, LXConsole sends show control messages when cues are run. These messages use the command format specified in the MIDI preferences and the same cue number as the one being executed. Actions allow more fine-grained control over sending MSC messages. To only send MSC messages specified by actions, set the command format in the Preferences to "None". Selecting a MIDI Show Control action in the actions table and clicking the "Edit..." button will help you set up the parameters for the show control message. Typically, you will be interested in sending a "Go" command which is 1. There are other commands available depending on the receiver. Common commands include stop(2) and resume(3). Common command formats can be set using the popup button. The proper format will depend on the receiving system. A variety of general MIDI messages including program changes, control changes and notes can be sent using actions. Selecting a MIDI type action in the actions table and clicking the "Edit..." button will help you set up the parameters for the MIDI message. MIDI control changes can be sent continuously while a cue is running. Both the "Up/MIDI Control Change" and "Down/MIDI Control Change" actions will vary the control change value with the up or down progress of the cue. Specifying a single control change value for an "Up/MIDI Control Change" action will cause the control change message to vary from 0 to that value over the up progress of the cue. Specifying a single control change value for a "Down/MIDI Control Change" action will cause the control change message to vary from that value to 0 over the down progress of the cue. You can also specify a range of values for either of these actions. For example, you might specify "127-100" for a "Down/MIDI Control Change" action. This would send control changes with values from 127 down to 100 based on the down progress of the cue. An action can also send an OSC message. The format of these actions is discussed on the Setup window OSC Out page. Actions can control the linking of cues utilizing a counter. This allows you to create a loop of cues that are executed a certain number of times. Depending on the situation, this may work better than using an effect to run a loop of cues.
The loop counter is set by one of two commands, either "Set Counter" or "Set Counter (if not 0)". The difference being that the latter only sets the counter if it is currently at zero. The "Link if Counter > 0" action will cause the cue to follow its link only if the counter is currently at zero. And, it will also reduce the counter by 1. Here's an example of a two cue loop that executes each cue 4 times:
For a loop of indeterminate length, you can set the counter to an arbitrarily high value and use the "Set Next Go Cue" action to cause the next go to execute the specified cue, overriding any setting shown in the Live window. An action can also run an AppleScript that has been compiled into a .scpt file. Selecting an AppleScript type action in the actions table and clicking the "Edit..." button will allow you to browse for the script file. Because the script file is external to the cue file, its location is checked when the cue document is opened. If the prior location has changed, LXConsole looks for the script in the same folder as the cue document. If found there, the path to the script is adjusted accordingly.
Although it may be possible to run two AppleScripts from the same cue using different actions, the result is not predictable and this should be avoided. No Fade/Trigger Actions Only A cue can be set to only execute its actions and not to change any levels. With this option selected, the levels and fade times contained in the cue are ignored. When an actions only cue is run, there is no effect on the live output. But, the actions are executed. Commands
The Commands tab contains buttons that are used when working with the command line. All buttons have keyboard shortcuts that are shown in the button title. Channel Controls
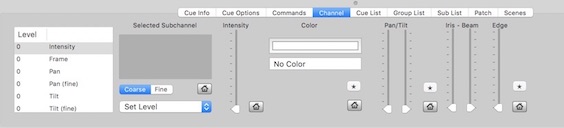
The channel controls tab displays and allows editing of the levels of all the subchannels that are available for channels selected in the main display. You can edit levels directly in the table of subchannels at the left of the tab. Changing a level sets that value for all selected channels that have that subchannel. Levels are displayed as percentage (0-100). You can set an 8 bit level by using "hdd" syntax where h is the letter 'h' and d is a hex digit. (ie. h80 = 50%, hff = 255 = 100% ). The parameter controls that occupy the rest of the window are mapped to the subchannels defined by LXSeries. The parameter sliders set levels of these subchannels. The color and pan/tilt controls have also set levels but can set multiple subchannels as appropriate. Colors can be set via the color well/color picker. LXConsole attempts to map the selected color to the closest match in the LXSeries color library. Or, if a scroll of colors is part of the selected subchannels, it will attempt to find the best match out of the available frames. Colors can also be set by name. This can be an exact reference, "R80". Or, you can enter part of the color's full name and choose from a popup menu. Entering "Primary" will show choices including "R80 Primary Blue". The Pan/Tilt Scroll area allows adjustment of pan and tilt using a scroll wheel when the cursor is located over it. A multi-touch trackpad or mouse allows both X and Y control. The Pan/Tilt Scroll control sets levels as 16 bits if both coarse and fine subchannels are present. The Coarse/Fine choice buttons set how rapidly or slowly the scroll wheel or gesture changes the pan and tilt values. The home buttons will set the appropriate level(s) to the home value(s) of the first selected channel/subchannel(s). Home levels are defined using the patch tab's channel table. The add defined value button below the pan and tilt sliders will create defined values with the current levels. These defined values are added to the currently selected channel's pan, fine pan, tilt and fine tilt subchannels. When a defined value is selected for any of these subchannels, the level is also set for the related position subchannels with a defined value with the same name. Cue List
The cue list tab contains a table with columns for the timing for cues and their parts. Group List
The groups list tab contains recorded groups and their names. Sub List
The subs list tab contains recorded submasters, their names and current levels. Patch
The patch table contains both the functional elements of a channel summary report/cheat sheet plus the patch and level (or park level) of each channel. If a channel has multiple parts, each will be listed is a different row when viewing the patch table by channel. When a channel has multiple subchannels, only the base address is displayed. (The channel setup sheet allows you to see and edit the configuration of addresses for the subchannels to create a new profile.) The level of each channel is displayed both in the main display and in the Level column. The Home column allows you to set the home level of each channel. A base address can be patched to the channel. An individual address can be set at a proportionate level by entering the address followed by @level. For instance patching a channel part to address 30 proportionally so that its range was zero to fifty percent would look like "30@50" in the Patch column. To set a proportional level for an address of a channel with multiple subchannels, switch the patch table to address mode using the popup in the lower right corner of the Inspector's tab. Addresses can be entered as integers 1-2048, or they can use universe notation, 1-4.512. The Park column is not shown by default. But, it can be used to override the output of a channel and force it to remain at a set level. The popup menu on the right side of the table allows you to customize which columns are displayed in the table. The display mode can also be switched from each row representing a channel to each row representing an address. Faders
The faders tab contains faders that can be used to control submasters. Each fader has an associated list of submasters that can be assigned to the fader using the next(>)/prev(<) buttons. The list of submasters as well as MIDI control changes for the fader are edited in the fader setup sheet accesible using the "i" button.
Scenes
The scenes tab contains a table of buttons used for playing back specific cues in scenes mode.
|